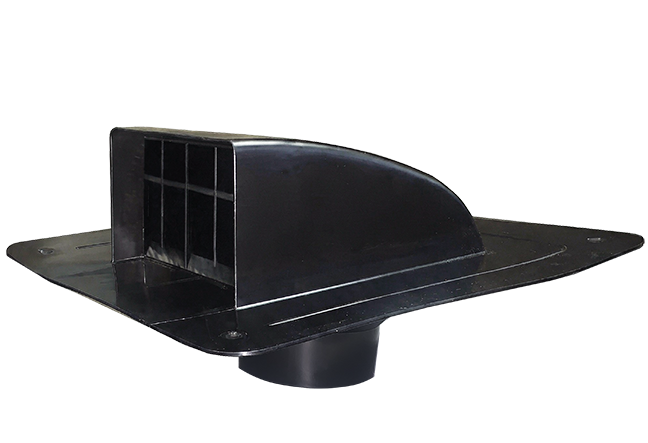
LOCATION OF COMBO VENT
1. Installed on a sloped, shingled roof to exhaust bathroom fans or dryers by the means of a roof opening.
2. Includes internal damper to reduce back-draft and an exterior grill to prevent the infiltration and nesting of birds, vermin and insects.
3. Once location is determined cut hole in roof deck (5”x5” hole or 5” round).
4. Insert the collar into hole and fasten to roof deck with at least 4 nails.
POSITION AND SECURE
1. Shingle up until the first full course of shingles covers the bottom of the hole.
2. Cut the excess shingles away and install the roof vent using the predrilled nail holes.
3. The top of the roof vent has a molded-in peak. Ensure that the vent is installed in the proper orientation.
4. Do not use roofing tar to seal the vent to the shingles. The wide flange and molded-in water guards will force the water down the roof over the shingles.
5. Use of roofing tar will void any warranty on the Combo Exhaust Vent.
6. Continue installing shingles, overlapping the flange on the vent.
7. Cut the shingles around the top of the vent to match its shape.
ADDING VENTILATION
1. Determine how much additional ventilation is required and the best location for the holes.
2. Inspect the attic to determine the location of rafters and any other obstructions.
3. Mark the holes in the appropriate hole locations on the top of the shingles.
4. Using a sharp knife, cutaway the shingles.
5. Drill a pilot hole and cut through the sheathing using a keyhole saw or electric reciprocating saw.
6. Inspect the hole for size and location and compensate if necessary. If the hole must be modified, ensure that any change will not enlarge the hole beyond the maximum recommended size.
7. Carefully remove the roofing nails within three inches of the hole.
8. Cut the shingles at the top of the hole to accommodate the molded peak of the roof vent.